


Screwing Metal Roofing. Correct & Incorrect Way Of Fastening A Metal Roof + Pre-Drill + Screw Guns
Learn About Screwing Metal Roofing And Fastening A Metal Roof. This screw and fastener installation video covers the correct & incorrect way to fasten a metal metal roof.
Install video that covers screw and fastener installation instructions for exposed fastener panels on a metal roof. Learn the incorrect and the correct way to fasten a metal roof.
The single biggest reason for metal roofing leaks is Incorrect screw attachment. Your roof will have thousands of screw penetrations and it's important you know the correct way to install the screws on your metal roof.
00:00 What is correct and incorrect way to fasten a metal roof?
01:00 How to install metal roofing fasteners. Screwing metal roofing.
02:11 What is swarf?
02:38 How to use a screw gun for metal roofing
04:01 How to pre-drill metal roofing panels
05:57 How to snap a chalk line for a metal roofing panel
In This Video We Cover
Installation of metal roofing screws
The Incorrect And Correct Way To Fasten A Metal Roof
How tight should metal roof screws be?
What do I do if I over-tighten metal roofing screw?
Do's and don'ts of fastening metal roofs
Removing the metal shavings
Do I need to remove the metal shavings from my metal roof?
How do I remove the metal shavings from my metal roof
Pre-Drilling Screw Holes
Using The Correct Tools
Chalk Lines
Step by step video that details how to incorrectly and correctly fasten corrugated metal roofing, R Panel, 7.2 Panel, U Panel, or Ag panel. Not intended for standing seam panels.
Visit Our WEBSITE
Visit our LEARNING CENTER
WRITTEN GUIDE – Metal Roofing Fastener Installation
Download Our INSTALL GUIDES
7/8" Corrugated
R Panel/PBR Panel
Western Rib/7.2 Panel
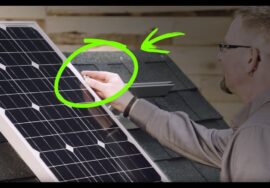
It is important to drive or install the screws correctly. This is a really simple procedure, but quite often it is done incorrectly. If you mess this up your roof will leak, so taking the time to correctly fasten the screws is exceptionally important. This video will be an excellent guide that will clearly demonstrate the correct way to tighten a screw.
The screws that you will be using will have a rubber washer with a metal cap. The rubber washer is just a bit smaller than the metal cap. You want to tighten the washer so that it spreads to the edge of the metal cap and not past the metal cap. When you tighten the screw it’s critical that you don’t drive it too far.
It’s a natural reaction to exert too much pressure and tighten the screw as much as possible. This will over compress the washer by expanding it too much and breaking the washer. If this happens back out the screw to relieve some of the pressure. If you over-tighten the screws then they might leak and will also need maintenance sooner.
Conversely, it is common to under-tighten the screw. The easiest way to determine if the screw is too loose is to see if you can spin the washer. If the washer spins, then the screw is too loose and should be retightened. You will develop a feel for fastening the metal panels correctly, but just pay close attention to ensure that the screws are installed correctly.
Screws Should Be Installed Straight And Not Sideways
Screws that are installed sideways or tilted will not permit the rubber washer to seal correctly. This will create a possible leak point. If you notice this has happened then back the screw out and redo so that the screw is straight.
FOLLOW US ON SOCIAL MEDIA:
FACEBOOK:
INSTAGRAM:
TWITTER:
LINKEDIN:
HOUZZ:
PINTEREST:
YOUTUBE:
Visit Our WEBSITE
Visit our LEARNING CENTER


Do you have a corrugated metal roofing job? If so check out this video that discusses screw placement + screw location + overlapping on a corrugated metal roof
https://youtu.be/wMdOnxBmu0E
Kudos for the video content! Sorry for butting in, I would appreciate your initial thoughts. Have you tried – *WoodBlueprints. Com* It is a great one of a kind guide for building better sheds and woodworking without the normal expense. Ive heard some decent things about it and my cousin finally got astronomical success with it.?
I’ve got so many idea how to use and to. Make, do
Metal roofing is like a wife
If you don’t screw it enough it will end up at you’re neighbors
All these tips helped me a lot thanks!
Glad I could help!
Kudos for the video content! Sorry for butting in, I would appreciate your initial thoughts. Have you tried – *WoodBlueprints. Com* It is a great one of a kind guide for building better sheds and woodworking without the normal expense. Ive heard some decent things about it and my cousin finally got astronomical success with it.?
Reminds me of Malcolm a lot
Can you install Western Rib onto battens?
Derick, there are a lot of factors that go into this and it’s a long answer. There is a good video online that should be helpful. Western Rib is just a typical exposed fastener panel.
This link should help you.
https://www.youtube.com/watch?v=pEWcwNg29Ag
Good!!!
Guys I am learning woodworking shed plans at *WoodBlueprints. Com* I recommend this website all you guys who are beginner or advance in woodworking
What if I only have a drill?
Then learn to know when to let off of the trigger at the correct time. just like i said bullshit to their statement of not to use an impact. i use a quarter inch drive impact and don’t have any problems because i “KNOW” when to ease off. LEARN
The main issue with a drill is that you are likely going to over-tighten the screws. This will damage the sealing washer and water will penetrate between the panel and fastener. My suggestion is to buy a screw gun, but if you cannot do that just pay close attention that you don’t over-torque the screws.
If You Can’t Screw by eyeballing it you don’t need to be screwing and I don’t have time for a chalk line
Is that why you’re on here looking at how it’s done ? ?
Guys I am learning woodworking shed plans at *WoodBlueprints. Com* I recommend this website all you guys who are beginner or advance in woodworking
Which is better screws are interlocking metal roofs.
Not sure I understand the question. An exposed fastener roof that has screws or a standing seam roof that has concealed fasteners and clips? Standing seam is a much better roofing system, but cost twice as much. Check out this video as it explains why.
https://www.youtube.com/watch?v=-4i8UZQ07X0
Which is better screws at
I was taught to put screws in the valleys to prevent compressing the sheet and throwing off the layout.
If you were to look in the installation guides of different manufacturer’s you would see it shown both ways.
Low = better attachment plus less chance of denting the high rib
High = more weather-tight.
The majority of installers think there is more value in a weather-tightness vs slightly better attachment.
Also unless you have a 29 gauge denting the top of the panels is not really an issue as you would be over-tightening the screw if the panel dented. That would create a potential leak point as it damages the screw washer.
We have explained it thoroughly in this video at one minute and 34 seconds
https://www.youtube.com/watch?v=wMdOnxBmu0E&feature=youtu.be
You would be correct sir by putting your screws on the high point this causes your rubbers to deteriorate faster because expansion and contraction from temperature change works on them more and at some point your rubber usually does not contact anymore when you put them down in the valley their way more likely not to leak I’m sure your comment has or will save a lot of headache for many individuals thank you for speaking out
It could be slowly leaking and you don’t know it – yet.
put all my screws in the valleys and have not leaked a drop in 21 years … love the rain on my tin roof at night …
What size fasteners are being used?
1/4” and 5/16”.
Assuming it’s a metal to wood screw the size of the screw will vary upon region and engineering requirements. Quite often you will use a #9 or #10 screw. For this job we would a #9X2″. The 2″ screw in the high allows a little more than 1″ penetration into the wood. For trim use a 1/4-14X7/8″. Both screws have a sealing washer.
very nice tips about roofing installation
We appreciate the positive feedback and support